Update: "Wand" Effect 13-07-2012
The
user interface in the Galaxy S3 is similar to all other Samsung phones
and tablets. It is more complicated compared to phones from other manufactures by the look of it, with many settings
and buttons all around the screen, making people rather panic on what to
choose. Unlike other phones from other companies which has simpler user
interface and cleaner view, the Samsung variant of camera interface
offers more power user features where you can set the settings on the
left panel.

On the screen, you will notice a few icons located at the upper right corner. In my phone, I have activated Voice Command, hence you will notice an icon of a speaking man as shown in the picture. Next to it you will see an icon of a power cable, indicating your phone is being charged if you are connecting your phone to the charger during that time. An icon of storage path is located at the far right where it will show a sign of a phone if the phone is selected as the storage path or a memory card icon if the storage path is set to the external SD card. If you have Wifi-Direct enabled in your phone settings, then you will also able to notice the Wifi-Direct icon for Share Shot feature.
The camera also offers a 4x digital zoom and can be accessed via the volume rocker located at the side of the phone.
I will start explaining from the left column and then to the right. Basically these settings are very basic and most of them are self-explanatory. Nevertheless, I will still run down once for those who want to know more.
Basically the first four icons on the left columns are the
Setting shortcuts and customizable to suit your need. Hence, I will directly start off with the
Setting icon.
Edit Shortcuts
The first option you will see in the Settings is the Edit shortcuts option. Tapping on it will bring you to a menu where you can simply drag and drop your most used settings for the ease of quick selection. Settings available to swap include Self Portrait,Flash, Shooting Mode, Auto Focus, Scene Mode, Exposure Value, Time, Effects, Resolution, White Balance, ISO, Metering, Auto Contrast, Outdoor Visibility and Guidelines.
The instruction is pretty straight forward and I believe everyone should be able to understand how to swap the icons. Just choose four quick settings that you need most.
Self Portrait
Well, this setting is pretty self explanatory. It means changing the camera from the back camera, to the front facing camera. In this Self Portrait mode, there are a few options disabled. Flash, Scene Mode, Auto Focus, ISO, Anti-Handshake, Metering and Auto Contrast are among the settings that are disabled in this mode. However, you will notice that "Save as flipped" option is now available where you can flip the image instead of seeing a mirror self picture.
Flash
This Setting has three option to choose and it is similar to any other digital cameras. You can either disable the flash, or enable it, or set it to Auto to let the camera decide whether to flash or not. Unfortunately, there is no red eye reduction option in this case.
One thing to note that, the flash equipped in the Galaxy S3 is very bright and more diffused. It gives a more natural exposure of the scene instead of a washed out image of white terror. It is still a LED light unfortunately, but having a LED flash light gives the advantage of lower power consumption and able to lit it all the time and use it as a flash light as well. The LED light can also be turned on during video recording and this is an added advantage for video recording in low light condition, even thou it may not help much. Compared to a Xenon flash which requires a pre-charge before firing and consumes more battery, I would say LED light is still the preferred choice for flash.
Shooting Mode
The Galaxy S3's camera offers many different shooting modes as you can see in the drop down menu above. Something worth mentioning is that the Scene Mode will be disabled if any Shooting Mode is selected except for None and Buddy Photo Share. More details about each Shooting Mode is discussed further in
Part 4: Shooting Mode.
Scene Mode


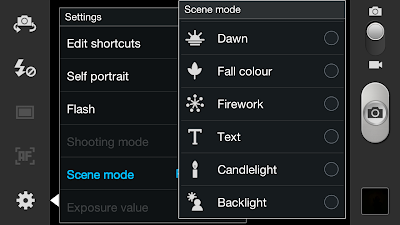
The camera software offers a total of 13 Scene Modes for various scenes and the functions or attributes of each mode is discussed in
Part 5: Scene Mode.
Exposure Value, or simply EV is a manual compensation setting for exposure when your camera metering fails to calculate the exposure correctly. For example, when you are shooting a dark object, especially when the whole frame is covered by it, your camera will think that you are shooting in the dark and automatically increases the ISO or shutter speed to allow more light. Resulting your image tend to wash out and your black looks like brown or any brighter colours. Similar scenario when you are shooting something very bright, like in the snow where everything is white. Your camera will think that you are shooting something bright and then lowers down the exposure, resulting your snow scene becomes very dark and dull.
This is a common problem for all digital cameras because the metering A.I. in the software is not as clever as our human brain where we can adjust different exposures independently. That's is why we often see our pictures came out different from what our actual eye sees. Despite attempts of improving the metering method and having better dynamic range for sensors. Digital cameras will still fail to get correct exposures sometimes and this is when the EV function slots in where users can manually increase or decrease the exposure value. In this camera phone, the EV range allowable is ±2.0 stops of light as shown in the picture above.
Focus Mode
There are three focus mode available for the Galaxy S3's camera and similar to any other cameras, which is the Auto-Focus, Macro and Face Detection. Auto focus is usually the fastest because it usually focuses at the infinity and close to infinity. Macro focus is slower because the object is nearer and it need to lock on a precise position before a picture is taken. Face detection works by detecting any human face and focuses on it, good for portrait or group photos because the camera will only focus on the center of the frame by default, which is sometimes not the position of the subject is located.
Update:
The Face Detection focus mode has been removed after updated to the recent firmware LFB/LF1. It is now only available in Shooting Mode only.
Timer
Timer is pretty much straight forward, instead of taking a picture as soon as you tap the button, you can also set a count down timer for the shutter. Typically used when taking group picture where you need to setup the camera and then let it count down for some time so that you have time to get into position. Timer can also be used to reduce handshake where you can set a 2 second timer and then tap the shutter button and hold your phone stable. Other than that, timer can be also use for self portrait where you set the count down timer on and then you take your time to pose for it.
Options of 2, 5 and 10 seconds are available.
Effects
The Effects available in the Galaxy S3's camera is rather disappointing with only three effects available, that is Negative, Black and White, and Sepia. The camera app in HTC One X offers more choices in this particular settings. Even thou such effect are widely available in third party camera apps such as Instagram, Paper Camera etc., it is still preferred if Samsung could add in more filters to make it an ultimate camera app where everything is available in one.
Update:
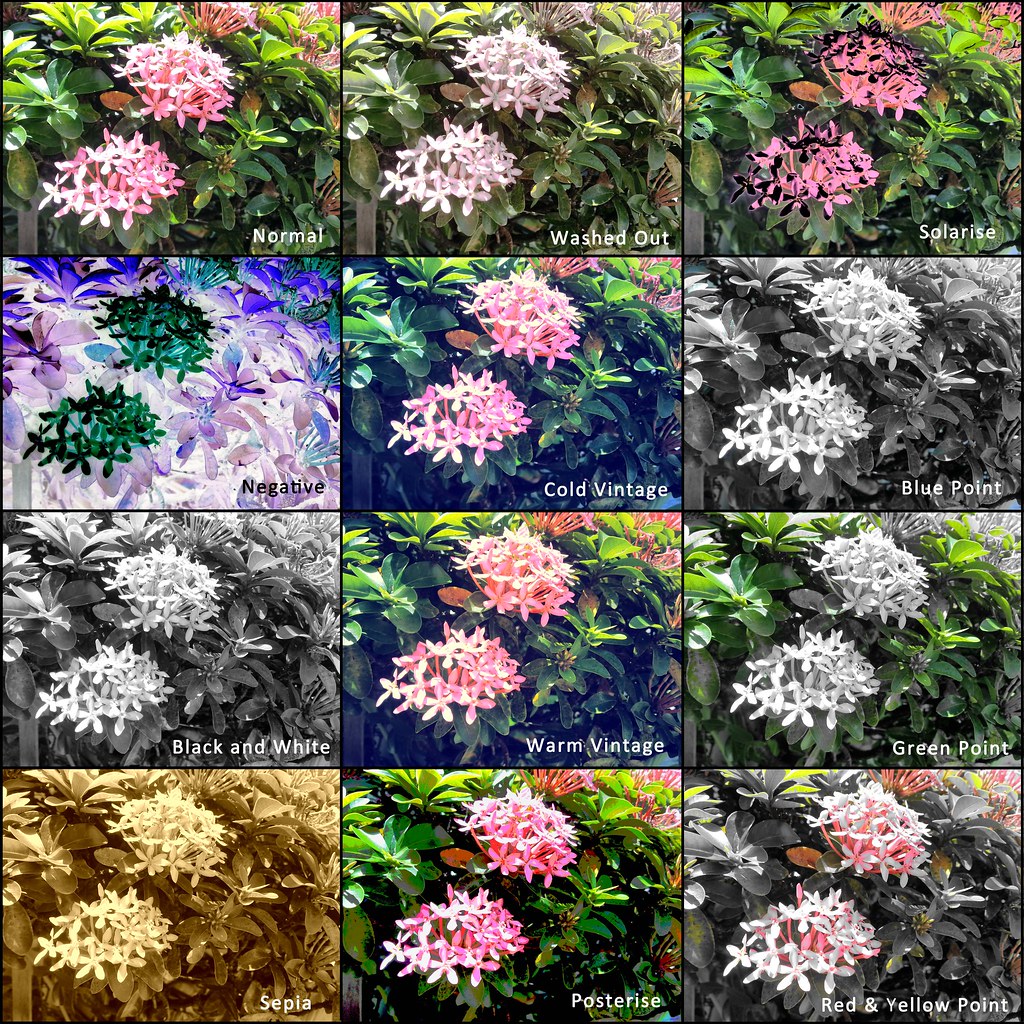
Looks like Samsung has answered to my call. The recent firmware update includes an upgrade to the camera software. Instead of just 3 effects available, Samsung has topped up the number to a whopping 11 effects, given the name "Wand". Detailed description of this update can be found in my recent post regarding the update
here.
11 filters were included into this current update:
- Negative
- Black and White
- Sepia
- Washed Out
- Cold Vintage
- Warm Vintage
- Posterise
- Solarise
- Blue Point
- Green Point
- Red-Yellow Point
Most of these filters are pretty self explanatory and I will let the sample pictures to do the talking instead.
However, this effects don't work with the front facing camera. Only the default effects like Negative, B&W and Sepia is working. All the effects are available for video recording thou.
Resolution
The Galaxy S3 comes with a 8.0 Megapixel camera similar to many other high end smartphones on the market. I personally do feel that 8.0 Megapixel is very sufficient for a phone. Even with my DSLR, I often shoot at 8.0 Megapixel to save storage space. I felt that instead of pumping the megapixel, manufactures should focus on the sensor's capability to deal with noise and colours, as well as lens quality.
There are total of 6 available options for resolution and I would recommend to leave it at default of 8.0 Megapixel since the image is compressed small enough that will not hurt our storage. Furthermore, smaller megapixel means lesser noise as well.
White Balance
I believe many people are familiar with this term, "White Balance". Often people get very funny colour with their pictures especially inside restaurant where you see everyone suddenly becomes yellow man. It is always advisable to set your white balance correctly beforehand to avoid heavy post processing, and as expected, there is no RAW output from our camera here.
Four options of preset White Balance settings are available and unfortunately there is no manual White Balance option available.
ISO
ISO is the light sensitivity of the sensor. The higher the ISO, the brighter your image (given that aperture and shutter speed is kept constant), at the same time introduces more noise. ISO is measured by stops and every stop doubles the light amount. Light sensitivity of a sensor is increased by increasing the current supplied to each pixel to capture light. The higher the current, the hotter the pixel becomes and quality starts to degrade, hence noise is introduced.
In the camera Settings, the ISO can be set manually from ISO-100 until ISO-800. While in Auto Mode, the ISO can range from ISO-80 until ISO-1600.
Metering
Metering is a term used to describe how a digital camera evaluate the light intensity and thus adjusting the exposure. There are three method available in the Galaxy S3's camera, with Centre-weighted being the most commonly used one. For normal users, I will recommend you to leave this by default if you don't understand how metering works.
Centre-weighted average metering is the best because it evaluates the overall brightness of the frame and then gives more attention to the centre. This metering mode is the preset for all digital cameras and usually will get the exposures correctly most of the time. Spot metering measures the brightness only at one spot, which is the middle in this case and it ignores everything else within the frame. This mode is usually used when the exposure of your subject is critial, e.g. portrait shots where the exposure of the face is more important than the surroundings. Matrix metering measures the average brightness across the whole frame by dividing into sub-zones.
Outdoor Visibility
Turning on this function will change the screen brightness and font to facilitate viewing under the sun. However, sometimes even with this function on, I still find it hard to get a good look at the screen. Probably due to the strong sun rays in Malaysia. No other choice but to cover the screen with something else if you wish to have a good look of the screen under hot sun.
Anti Shake
Anti Shake is a function to reduce the risk of handshake by increasing shutter speed. This anti shake feature is different from what we understands from DSLR where the image stabilisation or the vibration compensation is done by hardware, a mechanism in the lens or camera body that detects movement and then compensates by counter reacting to the motion.
The Anti Shake function in the Galaxy S3 is a software feature instead of a hardware feature. It offers only one stop of vibration compensation by increasing the shutter speed by one stop and then increases the ISO for one stop as well. In order words, you are sacrificing image quality for better stabilisation.
Auto Contrast
Auto Contrast is a feature where the camera will automatically corrects some exposure errors for you. When this function is enabled, users are no longer able to alter the Exposure Value. With Auto Contrast On, you will notice a better contrast of shadow and highlights in your picture. I will try to get a sample picture to show the differences.
Guidelines
Guidelines is similar to any other digital camera where the frame will be divided into 9 zones as shown in the picture below. These lines are there to assist the composition of the picture for those who emphasize on picture composition theories like the rule of third.
Casual users usually won't bother about composition and will definitely turn off this feature because the lines are getting in their way of taking pictures.
Image Quality
In the Galaxy S3's camera, it provides more power user options than other phone camera app. It even provides the compression options where we can select between Normal, Fine and Superfine. By default, the Image Quality is set to Fine and you can manually change it within the settings to any other options available. The better the image quality, the bigger the file size. However, more details and sharpness can be retained.
I set my camera to be on Superfine by default now.
GPS Tag
GPS tag will tag your photo according to location for those who wants to pin point where their photos are taken. Usually used by travelers to track down their picture locations for documentary purposes.
Storage
Last but not least, the storage path option for users to choose where
their photos will be saved. All the photos can be saved in the memory
card except during Burst Mode where the camera requires the fast writing
speed of the internal storage to accomplish to task.
Video/Still Mode
The right column has fewer icons compared to the left column. Users can toggle between video mode or still mode by switching the button up or down. Still pictures can be taken while doing video recording as well by simply tapping the shutter button icon.
Shutter Button
The shutter button is the trigger for the phone to take a picture and is aligned at the middle of the phone together with the camera lens.
Gallery Preview
The Gallery Preview located at the bottom left shows the last taken picture and also offers a short cut into the Gallery app.
This is the end of the User Interface introduction. Please proceed to the next part to understand about the limitations of this camera phone in
Part 3: Limitations.